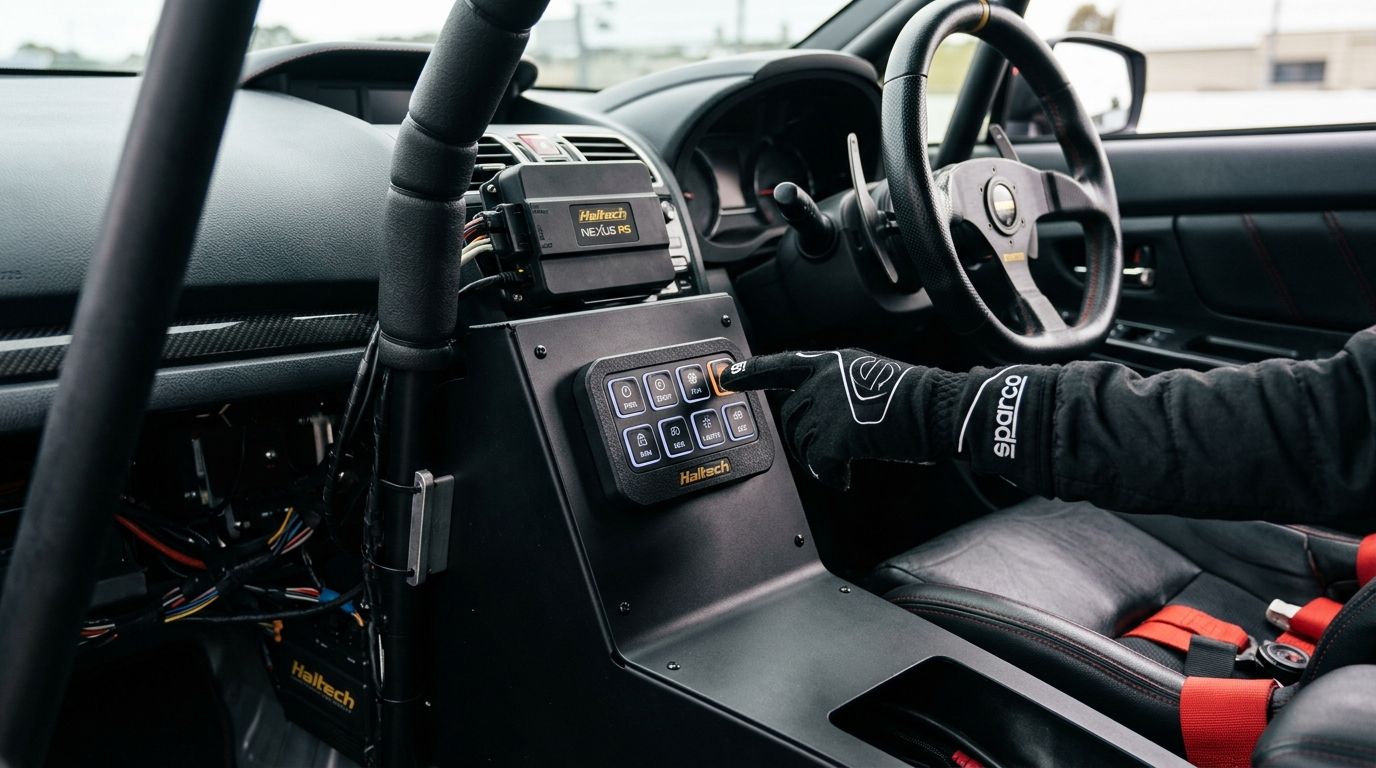
Wiring ten toggle switches and a relay box into a dash to run traction control, a pit lane speed limiter and launch control eats a full day and half a loom. A Haltech CAN keypad replaces that wiring with a single CAN bus module, so every button gets assigned a function in software instead of a new wire run through the firewall.
- A Haltech CAN keypad puts traction control, launch control, pit limiter and other dash switches on one CAN bus module instead of a bank of relays.
- Setup runs in three stages: wire the keypad onto a free CAN channel, enable the CAN Keypad module in the Haltech software, then assign each button to a function or output.
- Buttons support press-and-hold, so one physical key can run two functions on the same CAN keypad.
- Works on any Haltech ECU with CAN bus capability, including Elite, Nexus and PS-series units, not just ECUs paired with a Haltech dash.
Why this matters
A dash full of toggle switches means a dash full of wire runs, each one a point of failure in a car that vibrates, heats up and gets driven hard. A Haltech CAN keypad collapses that into one twisted pair CAN cable and a 12V switched feed, with every button function held in the ECU's configuration file instead of physical wiring.
That matters most on builds already running an ECU with spare CAN capacity, since the keypad shares the same bus as other Haltech CAN devices without extra looms. If your dash setup already runs a Haltech iC-7 dash, the keypad sits on the same CAN network and doesn't need a separate power or ground run.
A Haltech CAN keypad is the correct call whenever a build needs more than four or five dash-mounted functions and the ECU has a spare CAN channel; a couple of toggle switches on relays is still simpler for one or two functions.
CAN keypad vs traditional switches vs dash touch controls
| Control method | Wiring required | Function flexibility | Best for |
|---|---|---|---|
| Haltech CAN Keypad | One CAN cable, no relay box | Reassign any button in software, press-and-hold for a second function | Multi-function dash control on CAN-capable ECUs |
| Toggle switches + relays | Dedicated wire and relay per switch | One function per switch, physical rewire to change | Simple builds with one or two switched functions |
| Haltech iC-7 dash touch controls | Shares CAN bus with dash | Configurable per screen page, tied to display layout | Builds already running an iC-7 as the primary dash |
Before you start
- A Haltech ECU with CAN bus support — Elite, Nexus and PS-series ECUs all handle CAN Keypad modules; confirm your firmware supports the CAN Keypad function block before wiring anything.
- A 12V switched ignition feed and clean chassis ground for the keypad, plus the CAN Keypad wired into the same twisted-pair CAN bus as your other CAN devices.
- The gotcha: if the keypad shares a CAN address with another device already on the bus — a CAN dash, a wideband controller, a second keypad — both devices drop frames or fail to appear in the software. Assign the keypad a unique CAN ID before you power up anything else.
“If two CAN devices share the same bus address, both drop off the network — assign the keypad a unique CAN ID before you power anything else up.”
Wire the CAN keypad onto the CAN bus
- Run the CAN Keypad's CAN High and CAN Low wires to the same twisted pair used by your ECU's CAN bus, not a separate loom.
- Terminate the bus correctly — CAN networks need 120-ohm resistors at each physical end of the bus, and an extra keypad mid-bus doesn't need its own terminator.
- Connect switched 12V and ground direct to the keypad, not through an accessory relay that could drop voltage under load.
- Confirm continuity on both CAN wires and check for a clean 12V reading at the keypad connector before connecting to the ECU.
Expected result: the keypad's status LED lights on power-up even before it's configured in software, confirming it has power and ground.
Configure the CAN Keypad module in Haltech software
- Open your tuning file in Haltech ESP Pro Race Dash software and go to ECU Setup > CAN Setup.
- Add a new CAN Keypad device and assign it a unique CAN address that doesn't clash with any other CAN device on the bus.
- Set the correct CAN Bus channel (CAN 1 or CAN 2, depending on which physical bus you wired the keypad to).
- Click Send to ECU and confirm the keypad shows as Online in the CAN device list.
Expected result: the CAN Keypad status reads Online, and pressing any button shows a live state change in the software's monitor window.
Assign functions to keypad buttons
- In the CAN Keypad configuration, open the Button Functions table.
- For each physical button, select the output channel or ECU function it should control — traction control level, launch control arm, pit lane speed limiter, fan override, or a User Output wired to a relay or solenoid.
- Set each button as Momentary or Latching, depending on whether the function should toggle on/off or only fire while held.
- Save and send the configuration, then test each button against the live monitor before closing the laptop.
Expected result: every button toggles the correct function in the live monitor, with no cross-wired assignments.
Set up LED backlighting for button state
- In the same Button Functions table, assign an LED State source to each button — usually the same function the button controls.
- Set LED polarity to match whatever state should show as lit (active function on, or armed and waiting).
- Adjust backlight brightness if the CAN Keypad supports a dimming input tied to your dash lighting circuit.
Expected result: each LED reflects the live state of its assigned function, not just the button press itself.
Run two functions off one button (press-and-hold variant)
Most CAN keypad builds need more functions than they have physical buttons. Instead of adding a second keypad, configure a short press and a long press on the same button:
- In Button Functions, set the primary function on Short Press (under roughly half a second).
- Assign a second, related function to Long Press (held over one second) — commonly used to arm launch control on a short press and reset a shift light on a long press.
- Test the timing threshold on the bench before the car goes back on the road; a threshold set too short causes the long-press function to fire accidentally.
This doubles the practical function count of an eight-button CAN keypad without adding a second module to the CAN bus.
Troubleshooting
- Keypad doesn't appear as Online in the software — check CAN High/Low aren't swapped, and confirm the CAN address doesn't clash with another device on the bus.
- Buttons trigger the wrong function — the physical button labels and the software's Button Functions table are set up independently; recheck the assignment table against the physical layout, not the printed labels.
- LEDs don't match the actual function state — LED polarity is configured separately from button input polarity; flip the LED State setting rather than assuming a wiring fault.
- Keypad works intermittently on long wire runs — voltage drop across a long 12V feed can cause the keypad to brown out under load; run a dedicated feed rather than tapping an existing accessory circuit.
- Long-press function fires on a normal button tap — the press-and-hold threshold is set too short; increase it in the Button Functions table and retest.
Customize your keypad setup further
Once the base keypad functions are working, most builds extend the same CAN bus to cover more of the dash. A common next step is wiring a keypad button to cut power for wheel spin directly from the driver's seat instead of a pre-set traction control map, or setting a button to control boost by gear so boost target changes with a single press rather than a switch position.
Both of these reuse the CAN bus wiring already run for the keypad — no extra looms, just additional function assignments in the same software session.
Need a hand wiring your keypad?
Spool Imports stocks Haltech CAN keypads and can advise on CAN bus setup for your ECU.
FAQ
What is a Haltech CAN keypad used for?
A Haltech CAN keypad controls multiple dash functions, such as traction control level, launch control and pit lane speed limiter, through one CAN bus module instead of separate toggle switches. Each button is assigned its function in the Haltech tuning software.
Can a Haltech CAN keypad control more than one function per button?
Yes, a short press and a long press on the same button can be assigned to two different functions. This effectively doubles the usable function count on an eight-button CAN keypad without adding a second module.
Does a Haltech CAN keypad work with any Haltech ECU?
It works with any Haltech ECU that supports CAN bus devices, including Elite, Nexus and PS-series units. The ECU's firmware needs to support the CAN Keypad function block, so it's worth confirming firmware version before wiring.
How many CAN devices can share one CAN bus with a keypad?
Multiple CAN devices — dashes, wideband controllers, keypads — can share one bus as long as each has a unique CAN address. Address clashes are the most common reason a keypad fails to appear in the software.
Is a Haltech CAN keypad better than switches and relays?
For more than four or five dash functions, a CAN keypad is simpler to wire and reconfigure than a bank of switches and relays. For one or two functions, a basic toggle switch on a relay is still the more straightforward option.
Can I use a Haltech CAN keypad without a Haltech dash?
Yes, the keypad connects directly to the ECU's CAN bus and doesn't require a Haltech dash to function. A dash like the iC-7 can share the same CAN bus, but it isn't a requirement.
What causes a CAN keypad to not appear in the software?
The most common causes are swapped CAN High/Low wiring or a CAN address clash with another device already on the bus. Confirm both before assuming the keypad itself is faulty.
Can the keypad control traction control or boost-by-gear switching?
Yes, keypad buttons can be assigned to trigger traction control levels or gear-based boost targets directly, once those functions are already configured in the ECU.
One last thing
The press-and-hold trick is the detail most builds miss on the first pass: wiring an eight-button CAN keypad without using long-press assignments leaves half its practical function count on the table. Set the threshold, test it on the bench, and the same keypad covers what would otherwise need two modules.